
Free Bird Feeder Plans
Step-By-Step Instructions & Photos
Below you will find detailed free bird feeder plans for a hopper-style feeder that we designed and currently use in our backyard year-round.
These are fairly easy bird feeder plans for first-time builders, yet is very attractive, especially to the birds!
Below these plans, we also have free bird feeder plans for other types of feeders including platform, suet, tube, and hummingbird feeders.
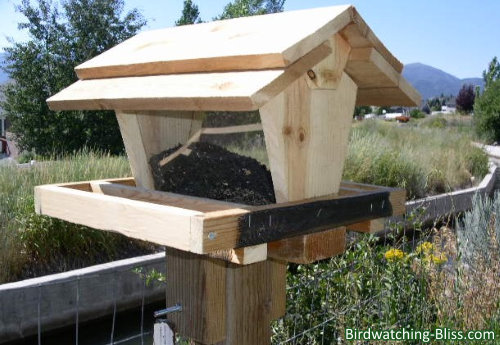
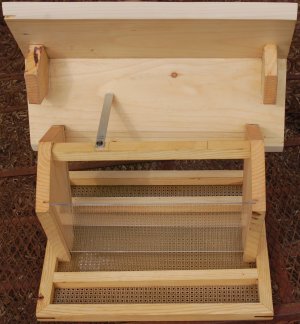
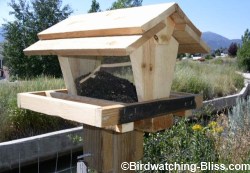
Solid Roof, Screen Tray, Large Hopper, Wooden Bird Feeder Plans
This design will create a large birdfeeder and will easily hold a gallon of bird seed.
It accommodates small and large visitors with inner and outer perching areas, is easy to refill and keeps the bird seed dry.
We tried to make these plans as simple as possible and for the feeder to be built cheaply.
You could always fancy it up, but save your money on the fancy extras 'cause the birds don't care and instead spend it on better seed!
Features of this Homemade Bird Feeder:
- Sealed overhang roof, not hinged which prevents bird seed from getting wet
- The mesh tray at bottom of hopper allows for air circulation and keeps bird seed dry
- Large bird feeder holds up to 1 gallon of bird seed in see-thru hopper
- Can be made cheaply with scraps of wood and/or cedar fence pickets
- Simple plans for beginner bird feeder builders
- One reviewer suggested that the feeder should be called the Extra Large Hopper Feeder or even the MOAB feeder (Mother of all Bird Feeders). It doesn't look that big to me, but four doves can feed at the same time with four more standing on top waiting their turn.
Problems with Bird Seed Getting Wet
One of the main problems we have found with most hopper type bird feeders, is that the bird seed can get wet in the tray and also at the base of the hopper where the seed is supposed to spill out.
This causes the seed to swell and block the opening and the bird seed starts to sprout, ferment and mold.
We're trying to attract and feed birds, not to make beer out of bird seed.
This would seem to be an easy fix by simply increasing the size of the overhang of the roof. Problem is, as you increase the overhang it becomes difficult to see the birds at the feeder.
So we are also looking for the right balance between the height of the bird feeder and the amount of overhang of the roof.
We purposely designed the overhang to protect the seed tray, but to allow water to drip on the perches so the rain helps keep perches clean.
This plan also uses a new idea to help keep the bird seed and the tray dry. Instead of using a solid wood or plywood bottom to the tray, we use fiberglass screen material (just like the screens on your doors and windows).
Sealed Roof Design
The second main problem with most hopper bird feeder designs is that the hinged roof used to fill the hopper with bird seed tends to leak.
Unless you live in the desert, this will just create a big mess and waste bird seed.
So this plan is for a solid removable roof.
I think the roof is heavy enough to stay in place without any attachments, but it would be simple to hold with a single screw or to drill a hole and attach with bolts or a latch.
Easy Bird Feeder Plans
Here is the basic layout and basic instruction for the Large hopper bird feeder. Detailed instructions, material list and exact dimensions follow below.
I have tried to keep the design and instructions simple and have assumed that you don't have much carpentry experience and don't have many tools.
I have also taken pictures in order to simply the process (a picture is worth a thousand words).
I estimate that it would take a beginner between 2 to 4 hours to make the cuts and assemble the bird feeder (not counting time looking at plans etc).
Ok, so it probably won't be perfect on your first try, but at least you tried. And if somebody doesn't like it... Tell them to go kiss a bird's cloaca! So let's get started on this build a bird feeder project.
Note: A visitor amended our plans slightly to make a beautiful extra-fancy version with a cedar-shingled roof, copper lined roof cap and a hinged roof to make it easier for filling the feeder. The details for the fancy version follow below our standard plans.
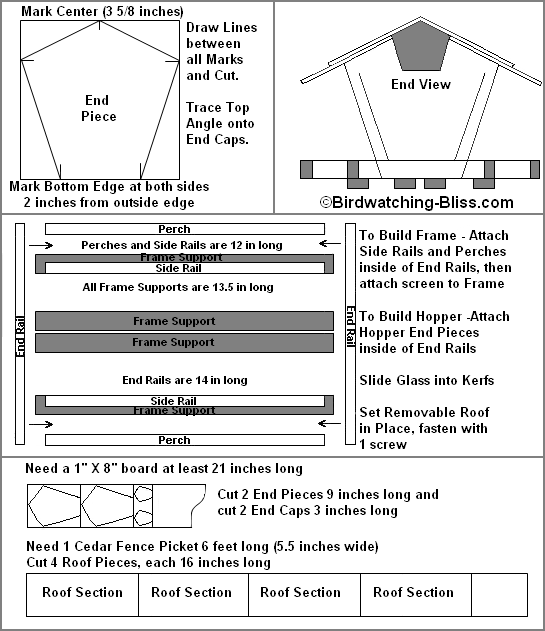
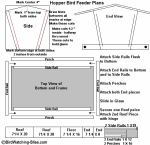
Materials List for Hopper Bird Feeder
I have found that cedar fence pickets are a cheap source of wood suitable for outdoor uses like bird houses and bird feeders (especially makes good roof material).
They are 6 feet (72 inches) long X 5½ inches wide and 5/8th inch thick and cost less than $2 each.
I used fence pickets for the roofing material for the bird feeder.
I used pieces from a 1 X 8 pine board for the Hopper End Pieces and two 1 X 2s for the tray framing, support for the screen and for the perches.
The bird feeder can be made entirely with scraps of wood or siding that you already have lying around.
Chances are, if you have scraps of wood lying around, you already have the know-how and the tools to build a bird feeder. If not, see the materials list below.
Lumber
- 1 1 X 8 at least 24 inches long (1 x 8 is really ¾ X 7¼)
- 1 cedar fence picket (5/8 X 5½ inches 6 feet long)
- 2 1 x 2 inch boards 8 feet long (1 x 2 is really ¾ X 1½)
Cuts from the 1 X 8 board
- 2 Hopper End Pieces from 1 X 8 (each 9 inches long)
- 2 Roof End Cap pieces (from 3 inch cut from 1 X 8)
Cuts from the fence picket
- 4 roof pieces from cedar fence picket (16 inches long)
Cuts from the 1 X 2 boards
- 2 frame End Rails from 1 X 2 (14 inches long)
- 2 frame Side Rails from 1 X 2 (12 inches long)
- 2 perches from 1 X 2 (12 inches long)
- 4 bottom screen support pieces from 1 X 2 (13½ inches long)
Screen Material
- Screen material (14 X 16 inches - enough to cover 10 X 12 tray with some overlap)
Hardware
- Staples (For staple gun or small fence staples
- Wood Screws (1¼ inch - Phillips head)
- Tacks, brads or small finishing nails
- Wood glue
Glass or plexi-glass
This plan is also designed to use glass or plexi-glass (polycarbonate sheeting) so you can see how much bird seed is in the hopper, but you could use a solid materials like masonite or thin plywood for the hopper sides if you prefer.
- 2 pieces (7 - 7½ inches X 11¼ inches)
Tools needed to Build The Hopper Bird Feeder
- Pencil
- Ruler or Tape measure and straight edge, square or speed square
- Saw (hand saw or power circular saw)
- Phillips Screw Driver or power driver with Phillips bit
- Glass cutter if using glass or utility knife and new blade for plexi-glass
That's all you need to get started.
If you have these additional tools, by all means use them to make job easier
- Table saw or sliding chop saw - for all square cuts and to miter cut roof caps and to make kerf cuts - safer and better cuts than with circular saw.
- Clamps - to help hold parts when you need more hands
- Staple gun - to attach screen to frame.
- Brad gun - make easy work of attaching all parts.
- Router and round-over bit - to round top parts of frame and perches for finished look (for people - birds don't care).
Full disclosure: I used a chop saw for making the square cuts, a circular saw and clamps for the miter and kerf cuts and a staple gun to attach the screen.
A Note of Caution about Making the Kerf Cuts
Be very careful. If you don't feel confident with making the kerf cut, the glass or plexi-glas could be mounted on the outside with sealant and large pan-head type screws to help secure it in place.
The glass will be mounted permanently instead of being removable, but better to be safe than sorry. It's not that important, we are just trying to feed birds, not solve the World's problems.
Directions for making the cuts for the Bird Feeder Pieces
We have a lot of photos, but couldn't place them all here because it makes the page load too slow, so instead they are referred to via the blue links. Just click to view the image related to the particular directions.
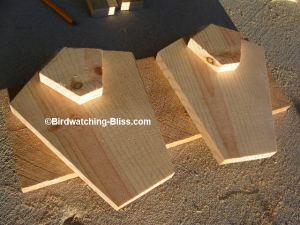
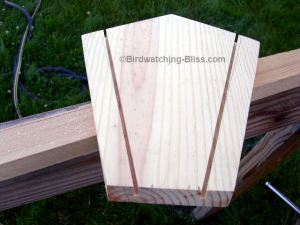
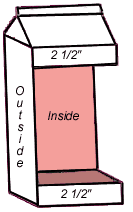
1. Mark and Cut the Hopper End Pieces (9 X 7¼) and as indicated in the diagram in the above link. above
- Turn so 9 inch side is up.
- Mark Center (3 5/8 inches).
- Mark Each Side, 2 inch down from top.
- Draw Straight line from Center to Each Side mark as shown in diagram.
- Mark the bottom 2 inches from both sides.
- Draw Straight line from Each Side mark to each bottom as shown in diagram.
- Make the 4 cuts on the Hopper End Piece.
- If not sure of your measuring and marking ability, use the 1st cut Hopper End Piece to mark the second End Piece.
- Make the 4 cuts on the 2nd Hopper End Piece View Finished Hopper End Pieces .
- If not satisfied the 2 Hopper End Pieces are similar enough, clamp together and file and sand until even Example showing clamped Hopper End Pieces.
2. Mark and Cut the Roof End Cap Pieces
The measurements of the End Caps are not critical,
but the angle on the top of the End Caps is critical.
The end caps are cut to the same angle as the end pieces, which
determine the angle of the roof.
The end caps fit under and are attached to the roof.
The roof section (with end caps attached) then slides down over and sits on the end pieces. The weight of the roof holds the roof in place unless it is very windy, then the roof is held in place with a screw.
- Cut a 3 inch section from the 1 x 8 board, then cut that piece in half. These two, 3 x 3 5/8 inch pieces will be the End Caps.
- Lay a previously cut Hopper End Piece on top of a piece that was just cut
- Center and Mark the Top Angles of the Hopper End Piece onto both End Cap Pieces as shown here
- After cutting the "shoulders" off the End Caps, Mark a 90° cut and make the cut as shown here
3. Mark and square cut the 4 roof pieces (from cedar fence picket) - each 16 inches long.
- Note: If you have the tools and ability to miter cut the roof crown, the exact angle is 28.89 degrees. I could only set the angle of my saw to just under 30 degrees. If not making the bevel cut, you should fill the gap with exterior or silicon caulk later.
4. Mark and square cut the framing pieces (from 1 X 2) as indicated below
- 2 frame End Rails 14 inches
- 2 frame Side Rails 12 inches
- 2 perches 12 inches
- 4 bottom frame and screen support pieces 13½ inches
5. Mark the two Hopper End Pieces and Cut the kerfs for the plexi-glass
- Mark the new outside edges of both Hopper End Pieces ½ to 1 inch from the outside and mark straight lines down both sides of both Hopper End Pieces.
- Cut grooves on these marks about half way through (3/8 in for 3/4 inch board) - the grooves only need to be the thickness of your glass or plexi-glass panels - saw blade is probably thick enough.
Note* There are several different ways to control seed flow from the seed hopper into the feeding tray - small seeds need only small gaps - be careful not to create gaps or notches too large so too much seed spills out.
Can always make a notch or gap bigger, but if the plexi-glass is cut, you can't make is smaller again.
Option 1 - Create a gap (about ½ inch) between the tray and bottom of glass panel or plexiglass
.- Stop the kerf cut about ½ inch short
- Fill the bottom ½ inch the kerf with wood putty
- Fill the bottom ½ inch the kerf with wood glue and sawdust
- Make a stop with small nail or screw inserted into the kerf
Option 2 - If using plexi-glass, notches or archways can be cut to let the seed spill out.
- Drill small hole first to prevent plexi-glass from splitting. Then score with utility knife until it breaks.
- Start small and increase if needed. Note I made notches slightly larger for final product than pictured (about 1 inch long and ½ inch wide). View notches cut in the plexi-glass
Now you have all the pieces ready for assembly.
1. Assemble the Roof
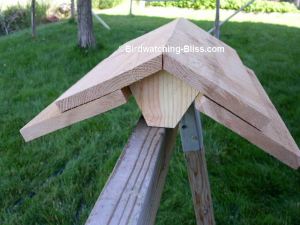
- For each 16 in Roof Piece, make a mark 2 inches in from each end. Then line the Roof End Cap up with the marks so there is 2 inches of overhang.
- The Roof End Caps serve two purposes. First to serve as base to glue and tack the roof pieces together and second to fit snugly over the two Hopper End Pieces that make up the hopper. So measure the spacing carefully so the roof will fit over the 12 inch inside space of the hopper.
- Glue and tack both End Caps to one roof section with small nails or brads View Diagram (end view)
- Glue and tack both End Caps to second roof section Picture and Diagram
- Glue and tack both End Caps to a third Roof Section Picture
- Glue and tack both End Caps to fourth Roof section Picture and Diagram
View the finished Roof Section Picture or End View Diagram
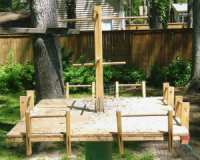
2. Assemble the Frame Base
- Align the End Rails with the Side Rails and Perches between them as in diagram above and the finished frame base. All of these pieces are set with the long sides vertically and short sides flat.
- Fasten the End Rails into the Perches with glue and one screw at each corner.
- Then Fasten the End Rails into the Side Rails.
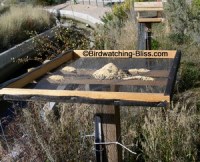
3. Attach Screen to the Hopper Base
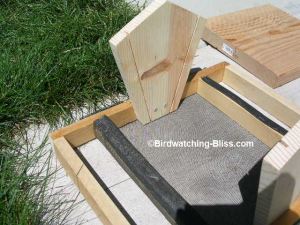
- Lay the screen material over the frame of the hopper feeder.
- Cut screen material leaving several inches overlap on each side.
- Fold the extra screen material several times for strength to hold the staples and pull the material tight around a corner and staple.
4. Attach the frame and Screen Supports (4 pieces) with screws only (In case we need to replace the screen). Note - the screen sags too much without these supports.
- Center two of the Screen Support pieces s in the middle of the hopper area and then one at each end. These support pieces are set with the long sides flat and the short sides vertically.
- Then finish stapling the screen to the outside Screen Support pieces.
5. Assemble the Hopper
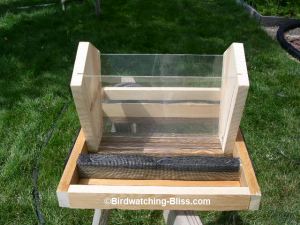
- Attach the Hopper End Pieces to the inside rail of the frame base with glue and tacks or screws.
- Slide the 2 plexi-glass panels into the grooves (kerfs) on both sides.
- If they don't fit well at first, try a different fits by turning the panels upside down, backwards and reverse sides. If the glass or plexi-glass is too large, glass would have to be re-cut, but plexi-glass could be filed or sanded. Before cutting, you might only need to slightly widen or deepen the kerf cut.
5. Attach Roof
- Simply set the roof on top of the two Hopper End Pieces to cover the hopper.
- If you live in a windy area, you might want to fasten the roof with a screw, pin, bolt or latches on each side.
View Completed hopper feeder mounted on post
That's it.
Now it wouldn't hurt to protect the bird feeder with some paint or polyurethane to help it last longer, but I plan to leave mine au natural, especially the cedar roof.
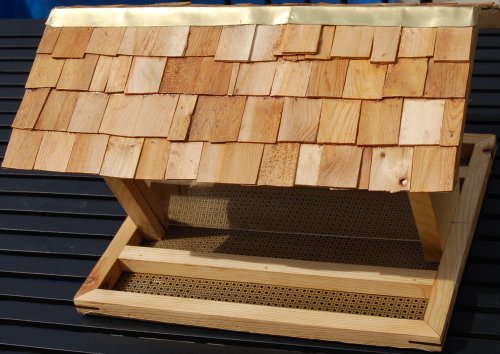
Fancy Bird Feeder Plans - Upscaled Version of Our Basic Hopper Feeder
We were pleasantly surprised when we got an email from Bill from Maryland.
Bill used our basic hopper bird feeder plans that some have jokingly called the MOAB feeder (Mother of All Bird Feeders) because it is large...
C'mon man. It's not that big! And turned those into what we now call the "fancy bird feeder plans" ;-).
I originally posted the plans above to encourage people to build a simple, functional DIY birdfeeder.
Bill has taken the simple plan, improved it and dressed it up. I don't think my version of the hopper feeder is an eyesore, but Bill's hopper feeder shows what a true craftsman can do.
Bill built this feeder for his elderly parents and felt therocess of filling the feeder by removing the top would be to cumbersome for them.
To make it easier, he added hinges to attach the roof to the hopper and to allow the roof to be opened without having to hold onto the roof with one hand and fill the hopper with the other hand.
He also attached a prop to hold the top open while the hopper is being filled with bird seed.
With the hinges attached, the weight of the roof stresses and torques the sides of the hopper, so a cross brace is needed for strength.
Bill's Changes and Additions to the Hopper Bird Feeder Plans
- Splined (keyed) miter joints instead of screws
- Glued "stops" in kerf instead of notching plexiglas
- Stamped aluminum screen instead of screen mesh
- Added brace between hopper end pieces - 10½ inches
- Attached roof with hinges and added prop
- Decorative cedar shingles - made from cedar shims
- Decorative copper roof cap - copper from hobby shop
- Coat of Spar Varnish to withstand the coastal climate
Splined or Keyed Miter Joint
Miter joints are really weak. Using the Spline or key technique not only creates very strong joints, but are also decorative. The technique is very easy and there are many videos available online that demonstrate how to do.
The cuts need to be made through the corners of the frame with a table saw or router which requires a jig to keep the cut square.
The decorative splines or keys are cut the same width as the blade that made the cuts and are simply glued into place.
Bill sent several pictures showing the process on other projects. In the photo, the left side shows the spline cuts filled with the spline material which have been glued in place.
The right side of the photo shows splines after the glue had dried, the excess has been cut off and sanded smooth.
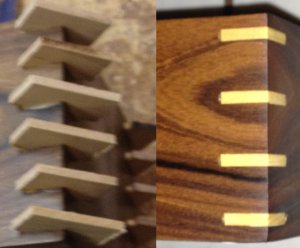
Use different colored wood for a decorative look or the same color wood for a strong joint.
Bird Feeder Hinge Installation
Drill pilot holes for all 8 screws and then fit the little 3/4" hinges on the top first. The angle between the top and the side supports prevents installation of the hinges if you screw them into the side/vertical supports first.
Also, you must place the plexiglass into the hinge side prior to screwing in the hinges. The screws interfere with the
plexiglass kerf and ultimate "lock" the plexi in place. The other side comes out easily with the top open for cleaning (if
required).
Note: The little hinges can be purchased at your local hardware store. However, they are "light duty" hinges and you
cannot use the screws that come in the package.
They are tiny and will not hold the weight of the top. I purchased eight #4 by 3/4" round head screws to give them enough holding power. It remains to be seen how the hinges hold up to the weather.
Nice job Bill and thanks again for sharing it with us.
We know your parents will get hours of enjoyment watching the birds at the feeder. Not to mention how many times they get to tell their friends that their son made it for them...And the birds won't mind either!
We look forward to seeing pictures of birds feeding at the hopper feeder when it is installed.
Now all you need to do is decide where you want to put it and how your going to put it there, then fill it up with bird seed and sit back and watch the birds. Now that is Bird Watching Bliss!
So far we have used only black oil sunflower seeds to attract bird species such as finches, chickadees, pine siskins and grosbeaks. It has kept the nuisance birds like house sparrows and starlings out and there has been little waste if any.
Construction Hints
If you haven't heard this old saying, then it's time you did.
Measure twice and cut once. If you ignore this advice and measure once, sooner or later you will have to cut twice.
And sometimes there is no cutting twice as the board is ruined. So take your time. When in doubt? Measure again!
If you are not experienced using a power saw, be very careful. Losing a fingers is not one of today's goals.
You don't want to have to have explain to everyone the rest of your life how you hacked off your finger, though it might make a good story. If you are under 18, use a hand saw.
Practice some cuts on scrap wood until you learn how to make the saw blade follow your marks and which side of the mark the blade actually cuts, especially if you attempt the bevel cut for the roof.
For longer cuts, try clamping another board or level to use as a guide.
If new at using a hand saw, go slow and easy.
We know you are strong, but don't force the saw with those monster power strokes.
When you apply too much force, the blade tends to twist. The cut starts to bend and the blade gets pinched in the wood.
Remember, we are supposed to be having fun and lowering our blood pressure, so smile and slow down.
To Attach Birdfeeder on top of Post or Deck Rail
If you simply want to attach your new birdfeeder to a post or to your deck, the floor of the feeder can simply be screwed into the top of the post.
A PVC pipe placed around a post will help keep the squirrels away.
I don't have problems with squirrels, so I didn't use pvc pipe, but did make a simple post attachment made from pieces of 2x4 that fit snuggly to the post.
Then I drilled a hole through the post and both sides of the 2x4s and fastened with a bolt.
Notice bolt and attachment of the hopper feeder to the postTemporarily Attach Birdfeeder to Post or Deck Rail
If you want to temporarily place the bird feeder somewhere to see how you and the birds like it, you can clamp it to a post or deck rail with "C-clamps".
Hang Bird Feeder from a post or tree
If you want to hang the bird feeder, the simplest way might be to place an eye bolt through each End piece of the hopper.
Remember the Roof overhangs the ends by 2 inches on each side, so the eye bolts need to extend at least 2½ inches, plus the thickness of the wood, plus at least enough on the inside for a nut to grab the bolt, so that means you need two 2¾ inch or 3 inch eye bolts.
Drill holes for the eyebolts, insert each eyebolt with a nut and washer inside and outside of the bird feeder.
Attach a chain or rope to the eye in each bolt and hang.
But remember that you would have to undo both eyebolts each time to refill the hopper.
Alternate Ideas for Hopper Birdfeeder
- The floor of the hopper could be made of aluminum screening or punched or expanded copper or aluminum (if holes were small enough) instead of screening or wood
- Metal flashing (inverted "V" shape) could be used to cover the hopper floor - to help seeds flow out easier and also help to keep seeds dry
- Perches could be made from two ½ inch diameter wooden dowels - Simply drill ½ inch hole in each end of the End Rails, slide in the dowels and glue into place. We received feedback from Troy, who claims the dowels reduce the number of squirrels and house sparrows.
- You could add some extended perches so more birds have places to perch, or so that larger birds like doves will have a larger "landing strip".
As we build more, we will be adding more plans for bird feeders in the future.
If you build this feeder, let us know and we'll show it off here!
We would be happy to post your photos, design alterations, etc.. and share with other prospective bird feeder woodworkers.
Easy Bird Feeder Plans for All Types of Feeders
 We've found that it's difficult to find free bird feeder plans all in one place, so we've searched the net and did it for you
as well as include our own plans for a hopper feeder.
Enjoy!
We've found that it's difficult to find free bird feeder plans all in one place, so we've searched the net and did it for you
as well as include our own plans for a hopper feeder.
Enjoy!
Choose the feeder that fits best with the kind of birds you wish to attract. Remember to use squirrel baffles when mounting feeders on poles as well as from above.
Hopper Bird Feeder Plans
Hopper bird feeders will attract a wide variety of birds, from chickadees to jays. It is an excellent feeder for black oil sunflower seeds.
This type of feeder is self-refilling, letting out a small quantity of seed at a time as the birds eat. The hopper has walls and a roof, to keep the seed dry, and small openings at the bottom, where a small portion of the seed can spill out from the main container onto a tray.
Below is a quick overview of building a hopper bird feeder from wood with plexi-glass windows.
We like our hopper-style, wooden bird feeder (plans above) that we built years ago and never had any problems with it and most importantly, the birds love it!
Platform Bird Feeder Plans:
Platform bird feeders will attract the widest variety of birds because it's basically an open tray that doesn't restrict birds, big or small, from eating.
This can be a pro and a con at the same time depending on the types of birds in your neighborhood. For example, if starlings, blackbirds, pigeons, etc. take over your feeder and keep out the smaller songbirds, you may not necessarily want to put up this type of feeder.
Click on photos for platform feeder plans.
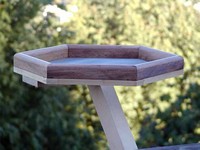
A nice addition to the basic design would be a roof or canopy to keep seeds dry. There should also be enough drainage holes to prevent water accumulation and subsequent mold and mildew growth. Here are platform bird feeders for sale.
Tube Bird Feeders
Tube bird feeders are cylindrical tubes that cater to smaller birds with its multiple feeding stations and smaller perches.
If you remove the perches, you can restrict the feeder to only those birds that can easily cling - finches, chickadees, titmice and woodpeckers.
Or if you prefer more variety, bottom trays attached to the tube will allow larger birds to land and feed. It is excellent feeder for black oil sunflower seeds and special variation can have tiny seed ports for thistle feeding.
You can also make a simple gravity-fed, tube feeder from plastic soda bottles, bleach bottles, etc. as shown in the video further above.
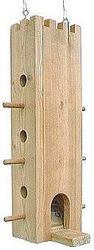
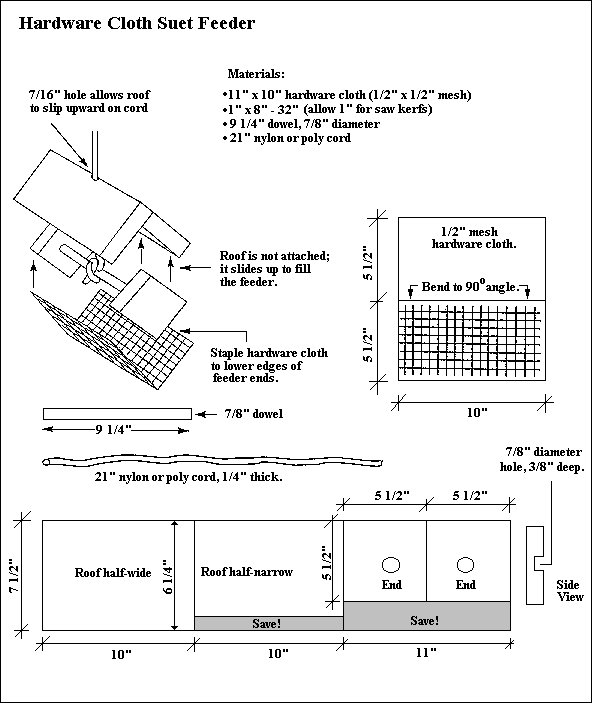
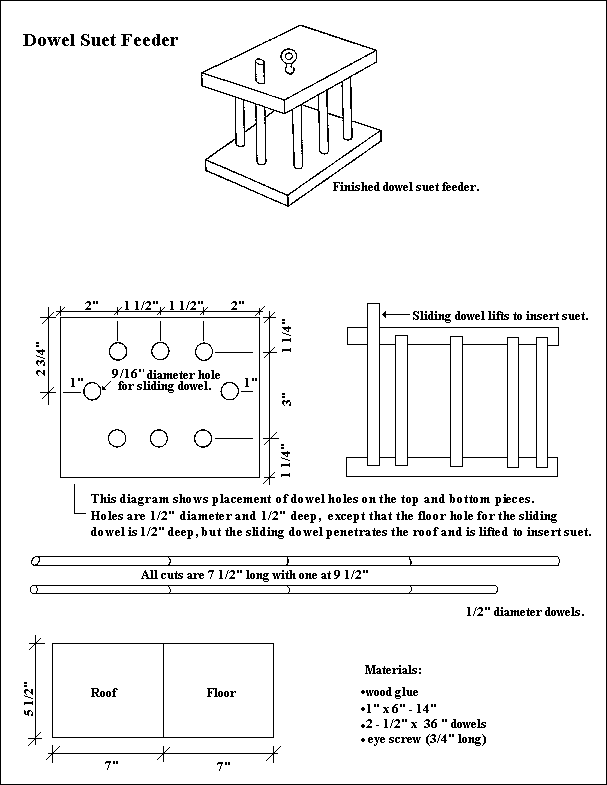
Suet Feeders
Suet is a high energy food made from animal fat. Suet feeders are mesh containers which hold suet blocks and allows "clinging" birds to feed through holes.
They will attract woodpeckers, chickadees, nuthatches, kinglets, cardinals, and creepers.
If starlings are a problem at your suet feeder, discourage them by using a suet feeder with access only from the bottom. Starlings are reluctant to perch upside down.
Chickadees and woodpeckers don't find that to be a problem.
Here is a fancier suet feeder if you are good with construction:
Click on photos for suet feeder plans
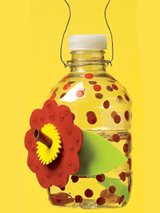
Homemade DIY Hummingbird Feeders
Hummingbird feeders are a real favorite for attracting the color, speed, and aerial acrobatics of this small but fascinating bird.
They are inverted containers filled with nectar, or sugar water, that is dispensed through tiny holes.
Construct feeders that are easy to clean because mold & fermentation will occur inside the feeder as quickly as 3-4 days.
click on photos for humminbird feeder plans
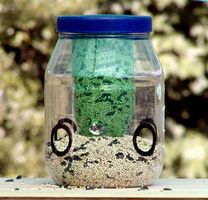
Feeders made from Household & Natural Items
For nearly no expense, you can build feeders from items found in or outside your house!
Below is a video demonstration to build a simple feeder.
Squirrel Proof Bleach Bottle Bird Feeder Demo
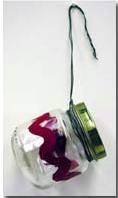
And here are additional plans for making feeders from a mayonnaise jar, pinecone and milk carton:

Hope you've enjoyed this page of bird feeder plans and we wish you all the best in attracting lots of birds with your new feeder!
If possible, try to place your feeder where squirrels cannot access them from above or where they are unable to jump to them...otherwise, without protection, you've just built a squirrel feeder as well!
And be sure to install a squirrel baffle either above or below your bird feeders depending upon if they are hung from a branch or mounted on a pole.
If you are finding it too difficult to keep away the squirrels from your bird feeders, here are some free squirrel feeder plans to make everyone happy! Fed separately, but equally sometimes will solve the problem.
Feeding Birds
There has been controversy as to whether or not bird feeding is beneficial to birds.
If you enjoy attracting birds to your backyard and love watching and learning about them, then it doesn't matter...But take the below precautions for the birds' welfare.
Bird have feeding preferences for food as well as for how they feed.
Some are ground feeders while others will feed from perches. So think about the birds first, then choose your feeder.
And just as important, don't forget to fill your feeder with the kind of bird food that your birds desire. If they don't like what's on the menu, they'll move onto the next restaurant!
Here is a simple hopper bird feeder design with step by step instructions:
We have also found some great books that contains lots of easy plans for bird feeders as well as more elaborate, decorative style plans.
We especially like the books that contain plans for feeders, houses, shelters and bird baths all in one and relatively cheap:
Easy To Build Birdhouses and Feeders
Remember, you do have an ethical obligation not to jeopardize wild birds with your feeders.
Follow the precaution links below in order to provide a safe feeding environment for your birds:
Install a Squirrel Baffle on your Bird Feeder Pole
Make it a family project and get everyone involved. Make sure everyone is aware of caring for the feeder (cleaning and filling) which translates to caring for the birds.
And most of all, enjoy learning about the birds that come to your feeders and create your own birdwatching-bliss!
Bird Feeder Plans by Type
Just as there are many different kinds of birds, there are many different kinds of feeders such as platform, tube and hopper. It all depends on which birds you wish to attract.
Here are some more plans to take a look at for different styles:
Bird Feeders
Top-rated, best bird feeders chosen by bird watchers.
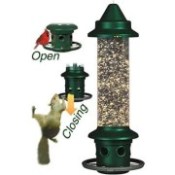
Best Squirrel Proof Bird Feeder Voted by Birders
Want to feed birds, not squirrels? This feeder
is one of best squirrel proof feeders on the market.
Best Window
Bird Feeders
Attach right to your window with one-way mirror.
Best Oriole
Feeder
Attract Baltimore Orioles as well as Hooded, Orchard and Bullock's Orioles with
a combination fruit bird feeder.
Squirrel Feeder Plans
And tips for
making your bird feeder squirrel-proof and perhaps build a feeder
just for the squirrels to keep them away from the bird feeder.
Also best
squirrel feeder.
Wild
Bird Food - What do Birds Prefer?
Which wild bird
seed to use in order to attract the species you desire to your
bird feeder.
Where should you place a bird feeder?
Install your feeder so that it's not easy for squirrels, raccoons, cats, etc.. to access the feeder.
Attaching a baffle on the pole of the feeder will prevent most critters from reaching the seed.
To prevent window collisions, place your feeder at least 30 feet aways from a window.
Window feeders are okay since the birds see the feeder on the window and not as a throughway.
Applying decals on the windows will also help prevent collisions.
Preventing Bird Window Collisions
|
Our Favorite Bird Watching Binoculars, Squirrel-Proof Feeder & Hummingbird Feeder Read Our Reviews: |
||
Nikon Monarch M5
Best mid-priced bird watching binoculars. Waterproof, shockproof, multi-coated ED-Glass. |
|
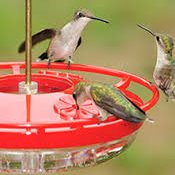
Best Hummingbird Feeder
Drip-Free, Ant-moat, Durable, Easy to Fill and Clean. |
| Click Images or Links To View More Info | ||