Free Platform Bird Feeder Plans
 We have two platform bird feeder plans for you to build. One is a fairly simple
design, the other a little more complex with added perches.
The first one is a very simple plan for a large (two feet square) platform bird feeder.
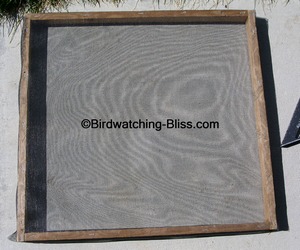
We have had such good results from using screening material for the substrate of our hopper birdfeeder design, we also built a platform feeder using the same screen for the platform base.
The screen material allows the bird seed, chaff and bird droppings to dry quickly after rain or snow.
It also allows for easy cleaning by simply thumping the screen from below and blowing away the chaff when necessary.
Materials List for Platform Bird Feeder
Lumber
- 2 - 1X2s - 8 feet long (1 x 2 is really ¾ X 1½)
- Post 1- 4X4 - 4-8 feet long (4X4 is really 3½ X 3½) (a 2x4 could also be used for the post)
Cuts made from the 1 X 8s
- 4 platform frame pieces 24 inches long each
- 2 platform support pieces 24 inches long each
- 2 post attachment pieces 6½ inches long each
Screen Material
- Screen material; 28 X 28 inches (enough to cover 24 X 25½ tray with some overlap)
Hardware
- Staples (For staple gun or small fence staples
- Wood Screws (1¼ inch - Phillips head)
- Wood glue
- 4 bolts, with nuts and washers are optional but make for a stronger attachment to the post
Tools Needed
- Pencil
- Ruler or Tape measure and straight edge, square or speed square
- Saw (hand saw, power circular saw or chop saw)
- Phillips Screw Driver or power driver with Phillips bit
- Crescent wrench (to tighten nuts if bolts used instead of screws)
That's all you need to get started.
Directions for making cuts and building the Platform Bird Feeder
1. Mark and Cut 4 frame pieces and 2 support pieces (24 inches each).
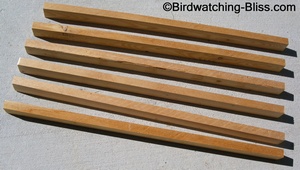
2. Mark and Cut 2 pieces to attach the platform feeder to the post (6½ inches each).
3. Assemble the frame for the platform birdfeeder.
- Drill holes for screws to prevent wood from splitting
- Apply glue to surfaces to be attached
- Attach with screws (two side pieces will be attached inside of the top and bottom pieces making the frame 24 inches in one direction and 25½ inches the other direction).
4. Lay the screen material over the completed frame of the platform feeder.
- Cut the screen material and make sure to leave several inches overlap on each side.
- Fold the extra screen material several times for strength to hold the staples and pull the material tight around a corner and attach with staples.
Click For Larger Photo
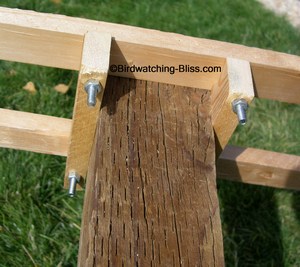
5. Mark the frame and screen supports for attachment of post attachment pieces.
- The two frame and screen support pieces need to be set apart the width of the post (I used a 4X4, which was 3½ inches)
- The two post attachment pieces also need to be set 3½ inches apart and need to be centered on the frame support pieces to help balance the platform on the post
6. Attach the frame and screen supports to post attachment pieces.
- Attach with screws and glue or with bolts (bolts are much stronger for these small pieces of wood. Align them to the marks and drill holes for either the bolts or the screws (I used ¼ inch bolts where are larger than needed, but that's what I had on hand)
7. Attach support pieces to the Post and to the Platform Feeder
- Drill holes and attach to post with screws as shown
- Drill holes and attach the frame and screen support pieces to the platform frame with screws
Click For Larger Photo
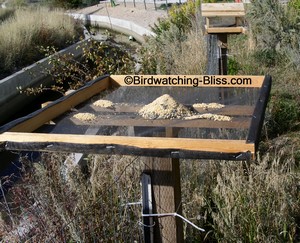
The completed platform bird feeder can be seen in the photo below.
You may have noticed that the wooden 4x4 post is attached to one of the wire fence T-posts with "zip ties" or cable ties.
This is so we can test several places before deciding where to permanently fix the post and feeder.
Zip ties will last at least a year exposed to the sun before they deteriorate.
So if you use this idea, you will need to inspect and replace zip ties as needed or your feeder may fall over.
Click For Larger Photo
Platform Bird Feeder Plans - Style 2*
Below are platform bird feeder plans from Bird Watching Bliss visitor, Ken Ablett of Chesapeake, Virginia.
He says:
"I have been using a platform feeder of my design for years. It is unlike any other I have ever seen. I would like to share it with others who enjoy back yard birds." Thanks Ken!
*Note that this design does not have a mesh bottom to allow for drainage so be sure to clean often and exchange the seed if it becomes wet (more of an issue in rainy, humid climates).
Otherwise you may have problems with mold which is not good for the birds.
We would recommend altering this plan to have a mesh screen for easier cleaning. You should also spray down the top to keep it clean, especially if bird feces accumulates.
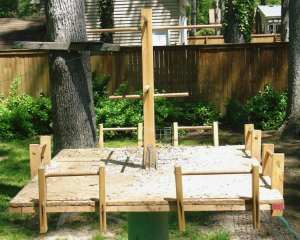
MATERIALS
- 1 - 7' 4" x 4"
- 1 piece of stovepipe or PVC to fit over 4" x 4" as a squirrel guard.
- 3 - 8' 1"x 2"
- 4 - 3" 1/2" oak dowels
- 1 - 2' 2" x 2"
- 1 - 32" x 32" ½" plywood *
- 4 - shelf braces, long side 6" to brace platform
- 4 - shelf braces, long side 4" to brace high lander
- 24 - # 4 3/4" wood screws
- 24 - # 4 1/2" wood screws
- 8 - 3/4" brads
- quantity of 1-1/4" nails
- quantity of 1-1/2" finishing nails, thin
* Most any piece of leftover plywood can be substituted but I've found that a 2' x 2' piece is too small to accommodate multiple bird species at the same time and a 4' x 4' piece is awkwardly big.
MATERIALS PREP
From the 1" x 2" cut the pieces that will form the edges on the bottom of the platform.
2 @ 32 "2 @ 29 "
- From the 1" x 2" cut pieces that will be the low landers.
- 16 @ 8" drill 1/2" hole 1" down from top (suggest first drill ¼" pilot hole).
- Cut notches 4-1/2 " to 5-3/4 " down from top and 3/4" deep.
What I do is to mark the 8' piece at 8" intervals, then draw the centerline (3/4") to facilitate locating the drill holes and the segments to be notched.
I saw to the mid line at the top and bottom of the notches.
After the pieces are cut from the long piece, I use a chisel to pop out the notches.
- The notches should fit snugly over the 1'1/4 inches of the platform and edge pieces.
- Cut the 8 low lander dowels, each 8"
- Place braces at the edges of the marked box, then mark where the screw holes will go.
- With a nail, make indentation in the platform base to facilitate starting the screws to attach the shelf braces.
- Attach the shelf braces leaving just a little slack in the screw tightness to ensure that the four braces will fit snugly over the 4" x 4"
Low Lander/Perch support pieces
On edge boards mark locations of where low lander uprights will be positioned later.
Make a mark 4" in from each corner.
The outside low lander uprights will be positioned there.
Each low lander is 8" long so that will leave 8" between
the landers on each side.
Low Landers Preparation
Place 8" pieces of dowel in lander uprights. (Helps to sand leading edge a
little.)
High Landers/Perches
For this step you already have shelf braces on the bottom side of the platform.
You can place the plywood base on a couple of TV trays with space between them for the attached shelf braces.
- Attach braces with 4" up on the base of the 2" x 2"
- Place 20" pieces of dowel in the two high holes and 12" pieces in the two low holes. Position dowels so that the slip-guard holes are vertical.
- Insert slip-guard nails into dowels on each side of 2 x 2.
- Center and attach high lander to base using scribed lines for reference.
- Attach platform to the 4" x 4" post. Tighten screws as needed.
- Slide the squirrel guard pipe up against the bottom of the platform and place a nail under the base of the pipe to hold it in position.
Low lander assembly
Place lander uprights in designated places.
Attach through back of the upright notch to the base with using 1'1/2" thin nails. One nail into the ½" plywood and one nail into the 1" x 2" edge pieces.
Cut the 2" x 2" piece for the high lander at the 2' length.
Drill 1/4" pilot holes, then ½' holes as follows.
On one side 1-1/2" from top and 12-1/2" from bottom.
On facing side 3" from top and 11" from bottom.
This will give you high landers and mid landers on each side of the 2" x 2" upright.
High lander dowels
- 2 @ 20" each
- 2 @ 12" each
Drill very small hole for slip-guard nails at:
- 9-1/4" from each end of 20" dowels
- 5-1/4"from each end of 12" dowels
When assembled, the slip-guard brads will keep the lander dowels from shifting position - and they will if not checked.
ASSEMBLY of Platform Bird Feeder
Place 4" x 4" post two feet into the ground a tamp dirt firmly around edges.
Suggest adding water to help settle the dirt.
Let ground dry and proceed when post is secure.
Place squirrel guard pipe over the post prior to adding the platform on top of the post.
On platform base (top side) mark mid points each side (16" in this case) and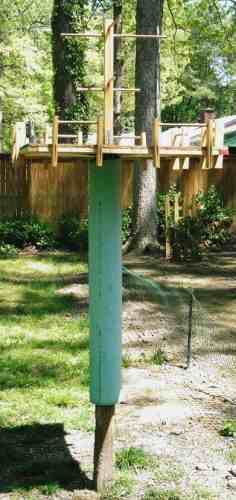 connect with pencil line.
From those center lines scribe lines 3/4" on each side of both lines. This will form a box 1-1/2" square where the 2" x 2" upright will be positioned.
On platform base (bottom side) mark mid points each side and connect with pencil line.
From those center lines scribe lines 1-3/4" on each side of both lines. This will form a box 3-1/2" square to fit on the 4" x 4" post.
Edge boards
On platform base (bottom side) attach 32 sides and 29" ends, nailing from top side of platform.
Post connect box
On bottom side:
The shelf braces will be attached to the bottom of the platform and the 6" sides
will fit down over the 4" x 4" when it is in the ground.
Ken says:
"On our feeder we get blue jays, cardinals, titmouse, nuthatch, chickadee, red headed woodpecker, downy woodpecker, doves, black birds, red-winged blackbirds, juncos, and an occasional sparrow. It is not unusual, in fact it is common, to have three different kinds on the feeder at the same time."
Good luck building your feeder. We hope you attract as many birds as Ken has.
If you do use these platform bird feeder plans to build your feeder, be sure to come back and let us know about your results. Send pictures!
More Bird Feeder Plans:
More Platform Bird Feeder Plans
Free Bird Feeder Plans Main Page
|
Our Favorite Bird Watching Binoculars, Squirrel-Proof Feeder & Hummingbird Feeder Read Our Reviews: |
||
Nikon Monarch M5
Best mid-priced bird watching binoculars. Waterproof, shockproof, multi-coated ED-Glass. |
|
Best Hummingbird Feeder
Drip-Free, Ant-moat, Durable, Easy to Fill and Clean. |
| Click Images or Links To View More Info | ||
